In this tutorial, I’m going to create a real-time voice agent that can respond to any query via speech, in speech that is initiated via a phone call using Twilio. This is an extremely flexible implementation where you can swap in any LLM or Text-to-speech (TTS) model of your liking. This is extremely useful for use cases involving voice such as customer support bots and receptionists.

To create this app, we use the PipeCat framework that takes care of stringing together all the components. Pipecat handles some of the functionality we might need such as user interruptions and dealing with audio data etc.

You can find the final version of the code here

Cerebrium setup

If you don’t have a Cerebrium account, you can create one by signing up here and following the documentation here to get set up

In your IDE, run the following command to create our Cerebrium starter project: cerebrium init twilio-agent. This creates two files:

  • main.py - Our entrypoint file where our code lives
  • cerebrium.toml - A configuration file that contains all our build and environment settings ‍ Add the following pip packages near the bottom of your cerebrium.toml. This will be used in creating our deployment environment.
[cerebrium.dependencies.pip]
torch = ">=2.0.0"
"pipecat-ai[silero, daily, openai, deepgram, cartesia, twilio]" = "0.0.47"
aiohttp = ">=3.9.4"
torchaudio = ">=2.3.0"
channels = ">=4.0.0"
requests = "==2.32.2"
twilio = "latest"
fastapi = "latest"
uvicorn = "latest"
python-dotenv = "latest"
loguru = "latest"

We need to setup a FastAPI server that will receive the call from our Twilio number and then upgrade the connection to a websocket connection - this is for the real-time two-way communication. To setup a Fast API server on Cerebrium is the same as setting up FastAPI locally. You can then add the following code to your main.py:

import json

from fastapi import FastAPI, WebSocket
from fastapi.middleware.cors import CORSMiddleware
from starlette.responses import HTMLResponse

from .bot import main

app = FastAPI()

app.add_middleware(
    CORSMiddleware,
    allow_origins=["*"],  # Allow all origins for testing
    allow_credentials=True,
    allow_methods=["*"],
    allow_headers=["*"],
)


@app.post("/")
async def start_call():
    print("POST TwiML")
    return HTMLResponse(content=open("app/templates/streams.xml").read(), media_type="application/xml")


@app.websocket("/ws")
async def websocket_endpoint(websocket: WebSocket):
    await websocket.accept()
    start_data = websocket.iter_text()
    await start_data.__anext__()
    call_data = json.loads(await start_data.__anext__())
    print(call_data, flush=True)
    stream_sid = call_data["start"]["streamSid"]
    print("WebSocket connection accepted")
    await main(websocket, stream_sid)

Don’t worry about the line from .bot import main - we will add this later. In your current directory, create a folder called ‘templates’ and inside it a file called ‘stream.xml’. We need to send back a xml response to Twilio in order to upgrade the connection to the websocket connection. Add the following code to the streams.xml file:

<?xml version="1.0" encoding="UTF-8"?>
<Response>
  <Connect>
    <Stream url="wss://api.cortex.cerebrium.ai/v4/p-xxxxxxx/twilio-agent/ws"></Stream>
  </Connect>
  <Pause length="40"/>
</Response>

The stream url will be the base endpoint of your deployment once our application is deployed. It should be the same in the above, you should just fill in your project id. Before we continue with our implementation, let us setup our Twilio number.

Twilio setup

Twilio is a cloud communications platform that enables businesses to integrate messaging, voice, video, and authentication capabilities into their applications through APIs. We will use them for this demo, but you can use any alternative provider. If you don’t have an account you can sign up here - they have a generous free tier.

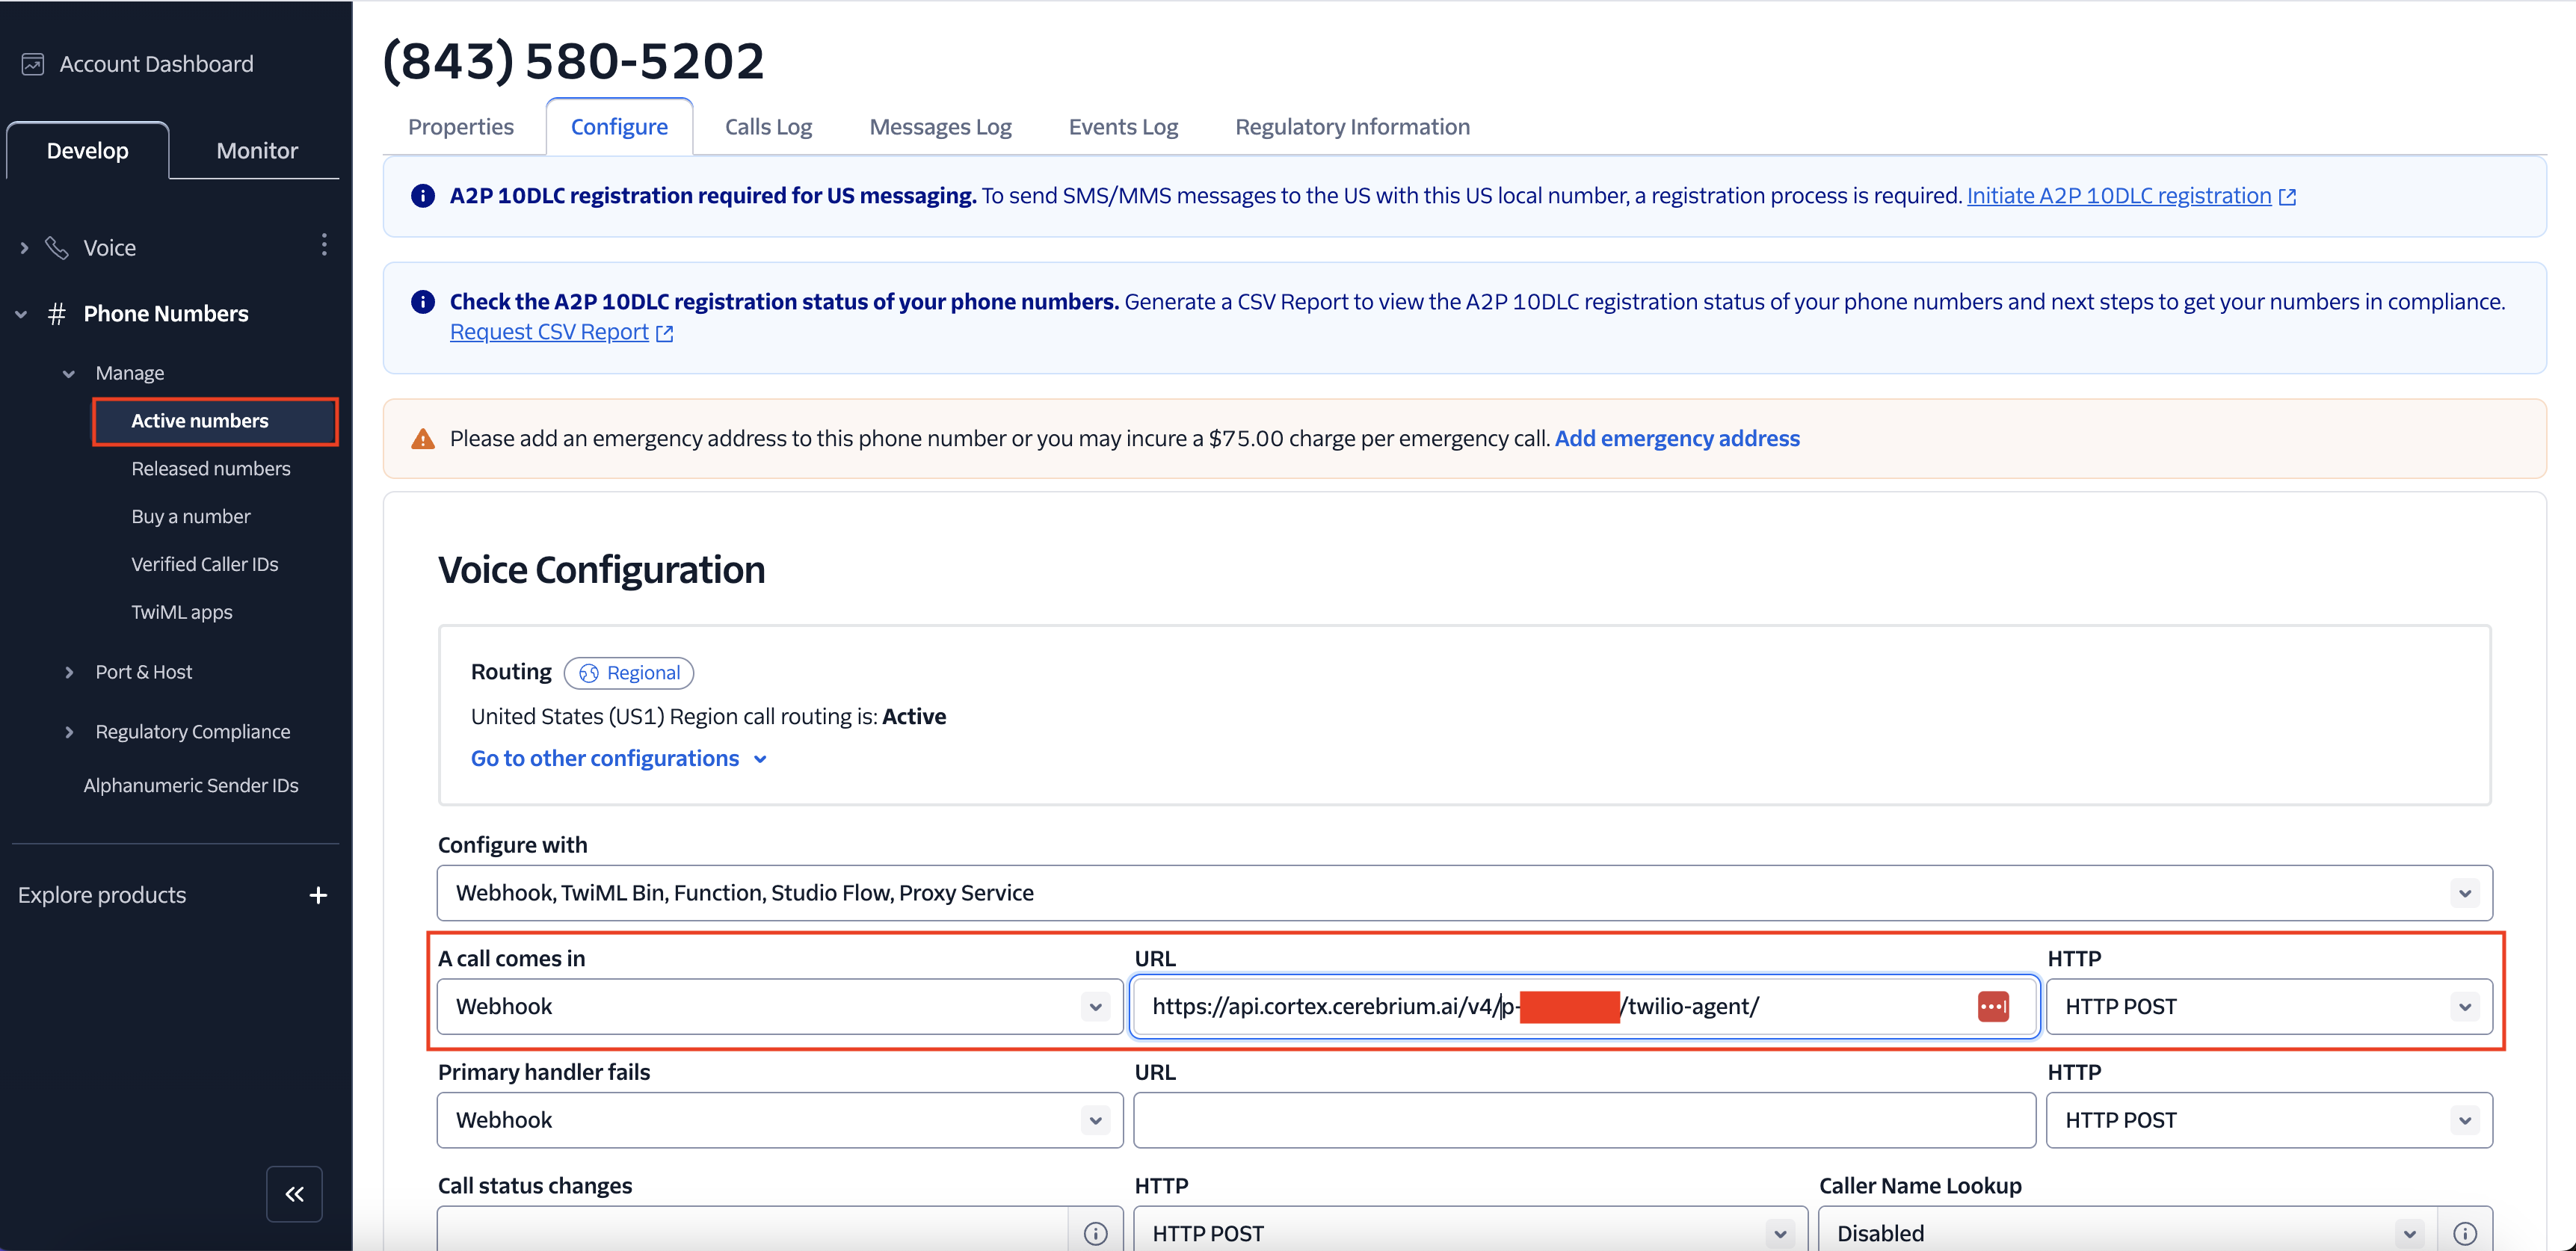
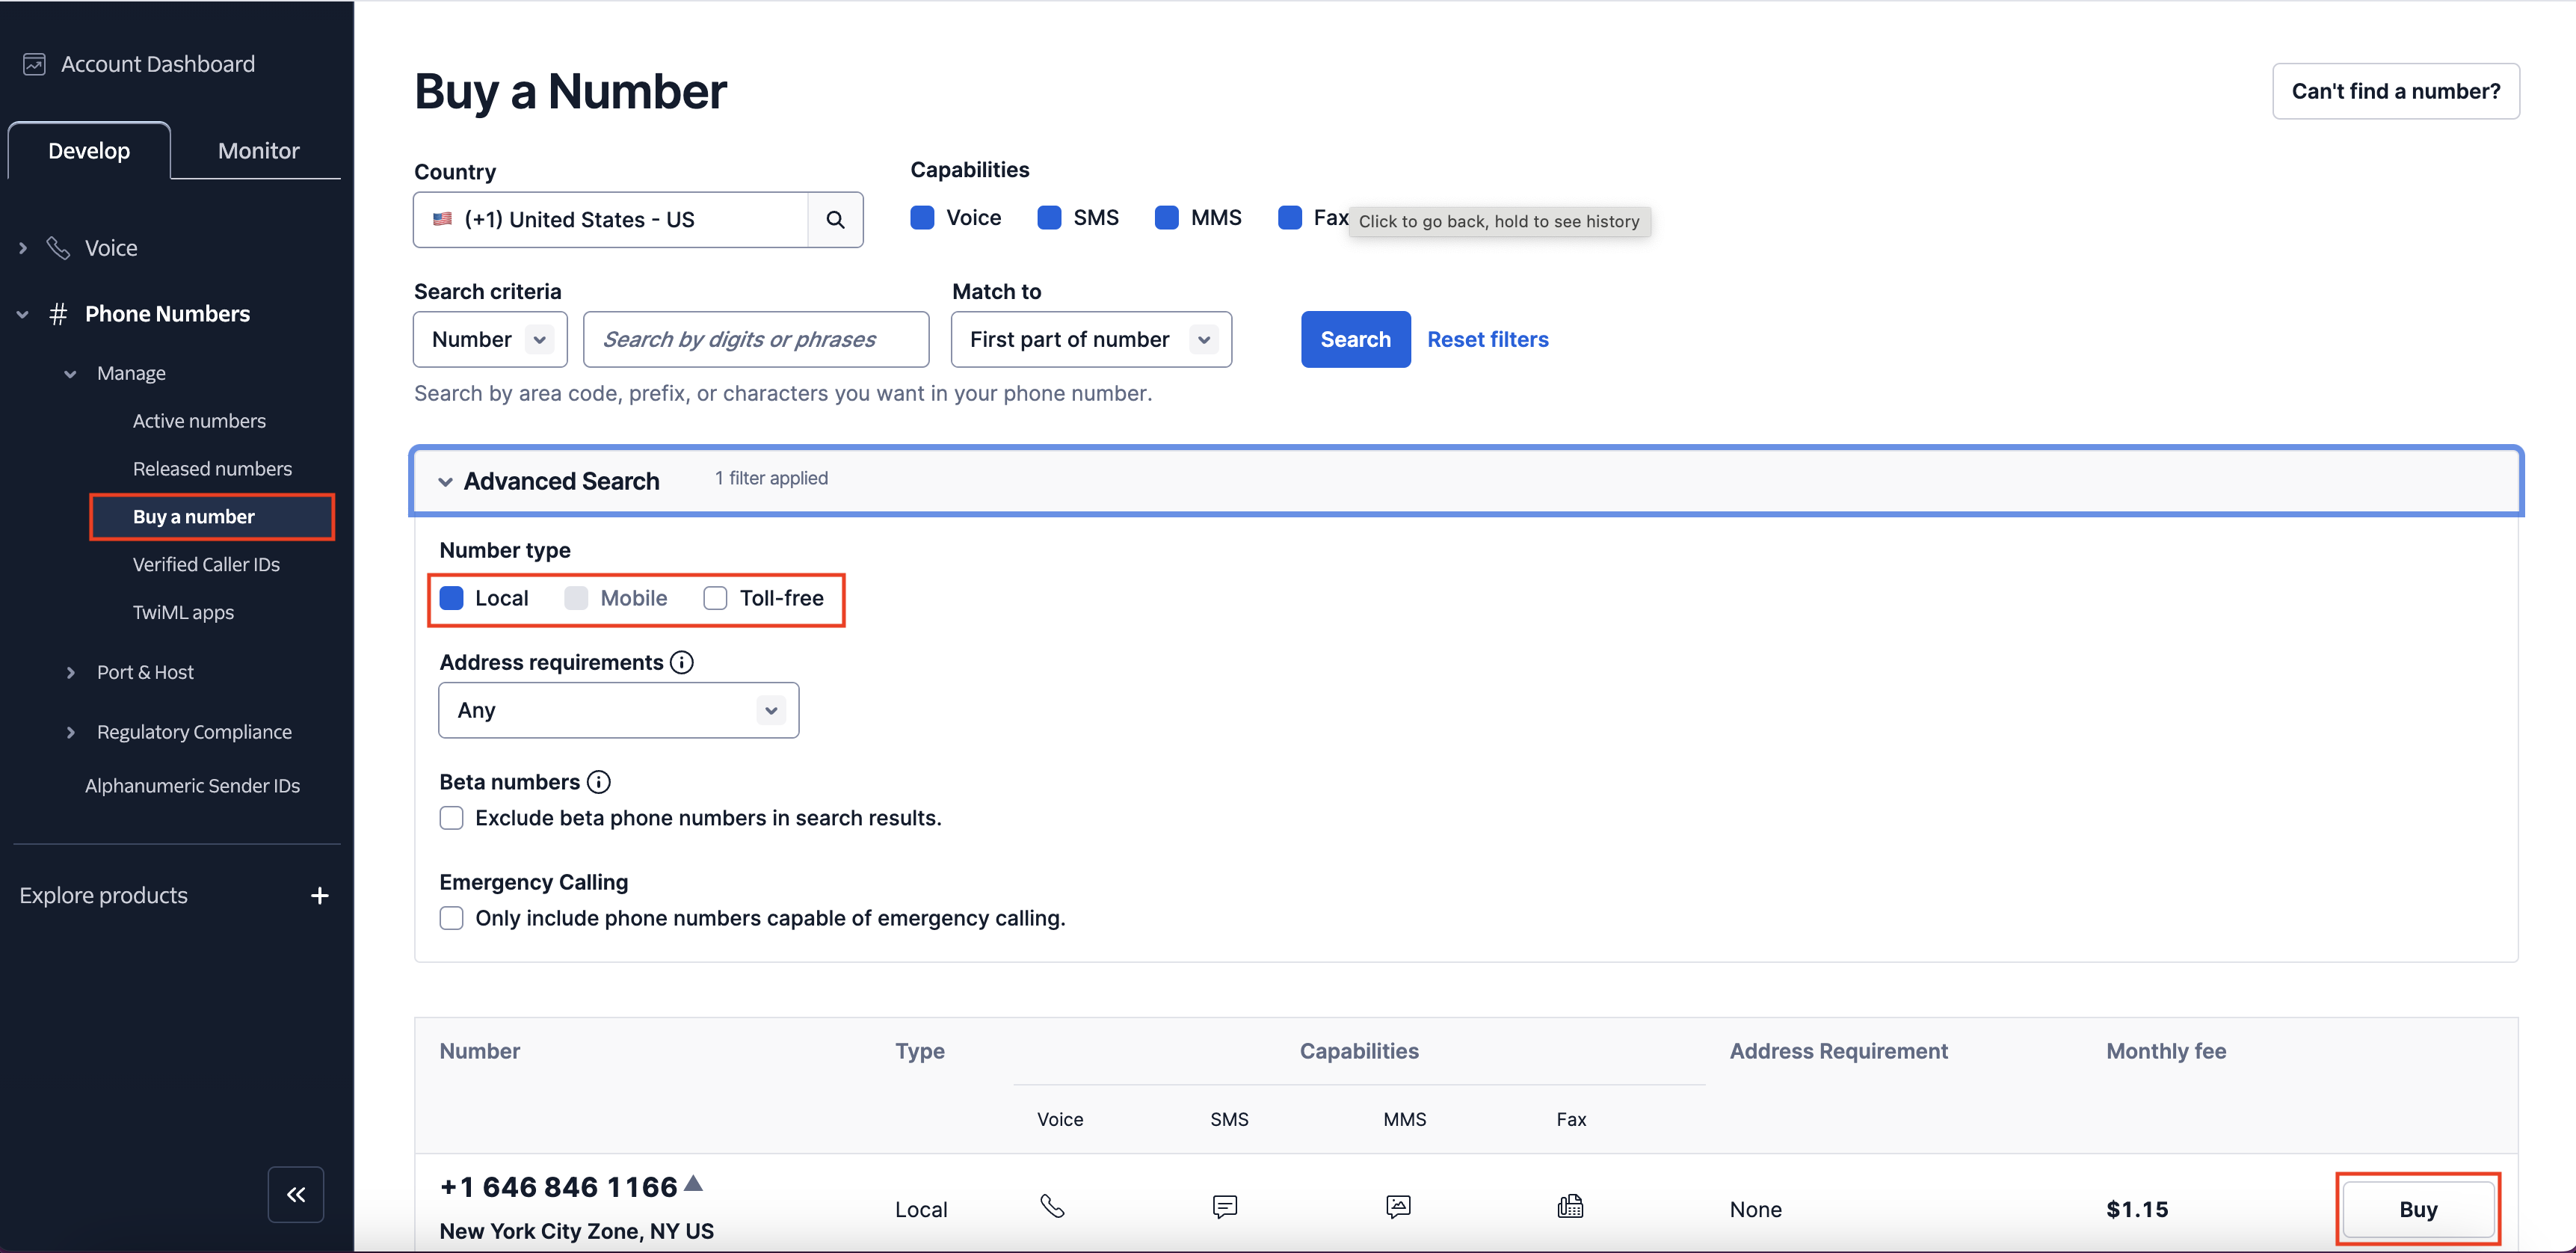
Once you have an account, you can navigate to the page in order to buy a number. When you buy a number please make sure its not a toll-free number - this won’t work. We then setup a webhook that hits our endpoint in order to connect to the agent.

You should then save the changes above and move on to setting up our AI Agent.

AI Agent Setup

In order to create our AI agent, we will be using the PipeCat framework that takes care of stringing together all the components and it handles some of the functionality we might need such as user interruptions, dealing with audio data etc. To setup our AI agent, let us create another file called ‘bot.py’ and add the following code:

import os
import sys

from loguru import logger
from pipecat.frames.frames import LLMMessagesFrame, EndFrame
from pipecat.pipeline.pipeline import Pipeline
from pipecat.pipeline.runner import PipelineRunner
from pipecat.pipeline.task import PipelineParams, PipelineTask

from pipecat.services.openai import OpenAILLMService
from pipecat.processors.aggregators.openai_llm_context import (
    OpenAILLMContext,
)
from pipecat.services.deepgram import DeepgramSTTService
from pipecat.vad.silero import SileroVADAnalyzer
from twilio.rest import Client
from twilio.twiml.voice_response import VoiceResponse
from pipecat.transports.network.fastapi_websocket import (
    FastAPIWebsocketTransport,
    FastAPIWebsocketParams,
)
from pipecat.serializers.twilio import TwilioFrameSerializer

from pipecat.services.cartesia import CartesiaTTSService

logger.remove(0)
logger.add(sys.stderr, level="DEBUG")

twilio = Client(
    os.environ.get("TWILIO_ACCOUNT_SID"), os.environ.get("TWILIO_AUTH_TOKEN")
)

async def main(websocket_client, stream_sid):
    transport = FastAPIWebsocketTransport(
        websocket=websocket_client,
        params=FastAPIWebsocketParams(
            audio_out_enabled=True,
            add_wav_header=False,
            vad_enabled=True,
            vad_analyzer=SileroVADAnalyzer(),
            vad_audio_passthrough=True,
            serializer=TwilioFrameSerializer(stream_sid),
        ),
    )

    stt = DeepgramSTTService(api_key=os.getenv("DEEPGRAM_API_KEY"))
    llm = OpenAILLMService(
        name="LLM",
        api_key=os.environ.get("OPENAI_API_KEY"),
        model="gpt-4",
    )


    tts = CartesiaTTSService(
        api_key=os.getenv("CARTESIA_API_KEY"),
        voice_id="79a125e8-cd45-4c13-8a67-188112f4dd22",  # British Lady
    )

    messages = [
        {
            "role": "system",
            "content": "You are a helpful LLM in an audio call. Your goal is to demonstrate your capabilities in a succinct way. Your output will be converted to audio so don't include special characters in your answers. Respond to what the user said in a creative and helpful way.",
        },
    ]
    print('here', flush=True)
    context = OpenAILLMContext(messages=messages)
    context_aggregator = llm.create_context_aggregator(context)

    pipeline = Pipeline(
        [
            transport.input(),  # Websocket input from client
            stt,  # Speech-To-Text
            context_aggregator.user(),
            llm,  # LLM
            tts,  # Text-To-Speech
            transport.output(),  # Websocket output to client
            context_aggregator.assistant(),
        ]
    )

    task = PipelineTask(pipeline, params=PipelineParams(allow_interruptions=True))

    @transport.event_handler("on_client_connected")
    async def on_client_connected(transport, client):
        # Kick off the conversation.
        messages.append({"role": "system", "content": "Please introduce yourself to the user."})
        await task.queue_frames([LLMMessagesFrame(messages)])

    @transport.event_handler("on_client_disconnected")
    async def on_client_disconnected(transport, client):
        await task.queue_frames([EndFrame()])

    runner = PipelineRunner(handle_sigint=False)

    await runner.run(task)
The code above does the following:

  • We connect our agent to our websocket transport layer that will send/receive audio.
  • We setup our LLM, TTS and STT services using Deepgram, OpenAI and Cartesia. You can select any provider you like - Pipecat supports a wide variety.
  • In order to authenticate all these services, we use Secrets. Add them to your Cerebrium dashboard.
  • Lastly, we then put this all together as a PipelineTask which is what Pipecat runs all together. The makeup of a task is completely customisable and has support for Image and Vision use cases. You can read more here. Pipeline tasks come with a structure and parameters that make it easy to handle interruptions out the box, and we are able to swap models to our preference only changing a few lines of code.
  • The Daily Python SDK comes with a lot of event webhooks where you can trigger functionality based on events occurring. So we handles certain events such as a user leaving/joining a call.

In order to improve the latency of the above system, you can run parts/all of the pipeline locally. This would help you achieve roughly ~500ms end-to-end latencies. You can read more how we did this here and here.

Deploy to Cerebrium

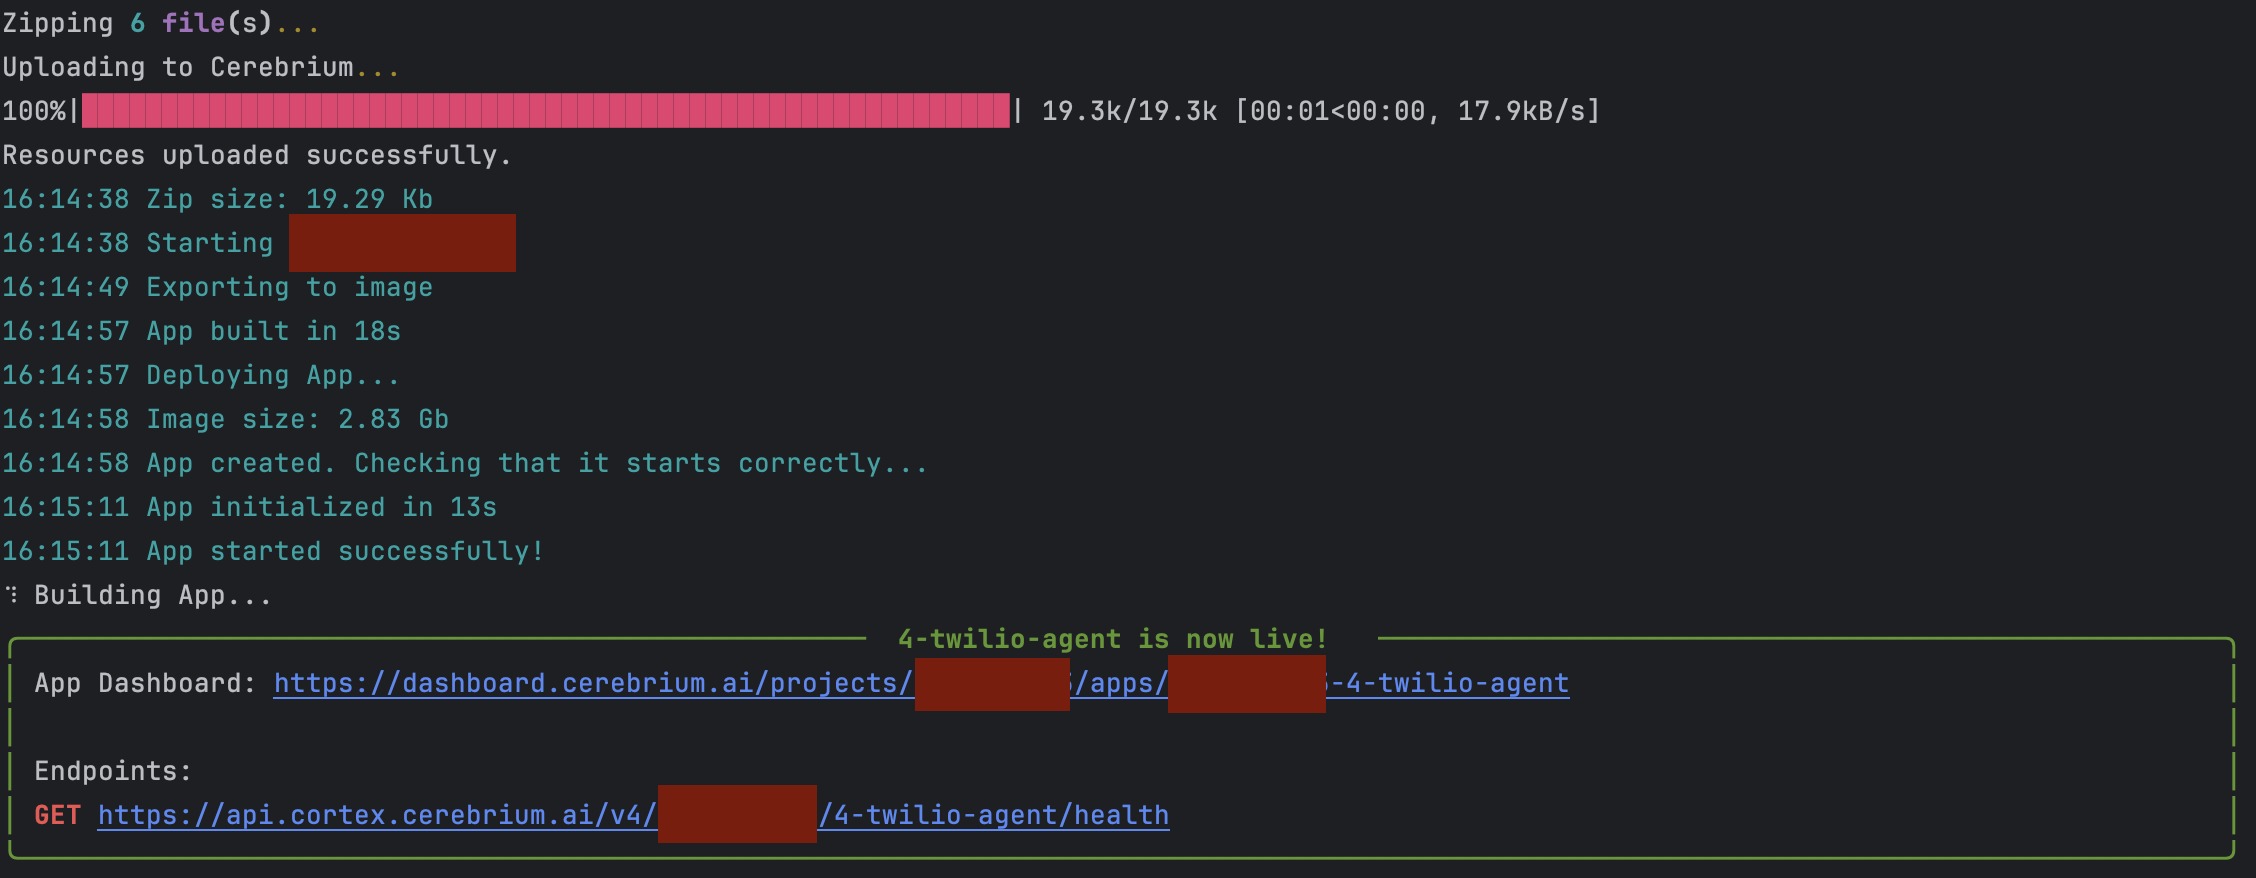
To deploy this app to Cerebrium you can simply run the command: cerebrium deploy in your terminal.

If it deployed successfully, you should see something like this:

In order to test this application you can simply call your Twilio number and the agent should start responding.

Conclusion

Hopefully, this tutorial acts as a good starting point for you to implement voice into your application as well as extend it into image and vision capabilities. Pipecat is a extensible and open-source framework that makes it easy to build applications like this, and Cerebrium makes the process seamless to deploy and autoscale while only paying for the compute you need.

Tag us as @cerebriumai so we can see what you build and please feel free to ask questions/send feedback to us on Slack or Discord communities