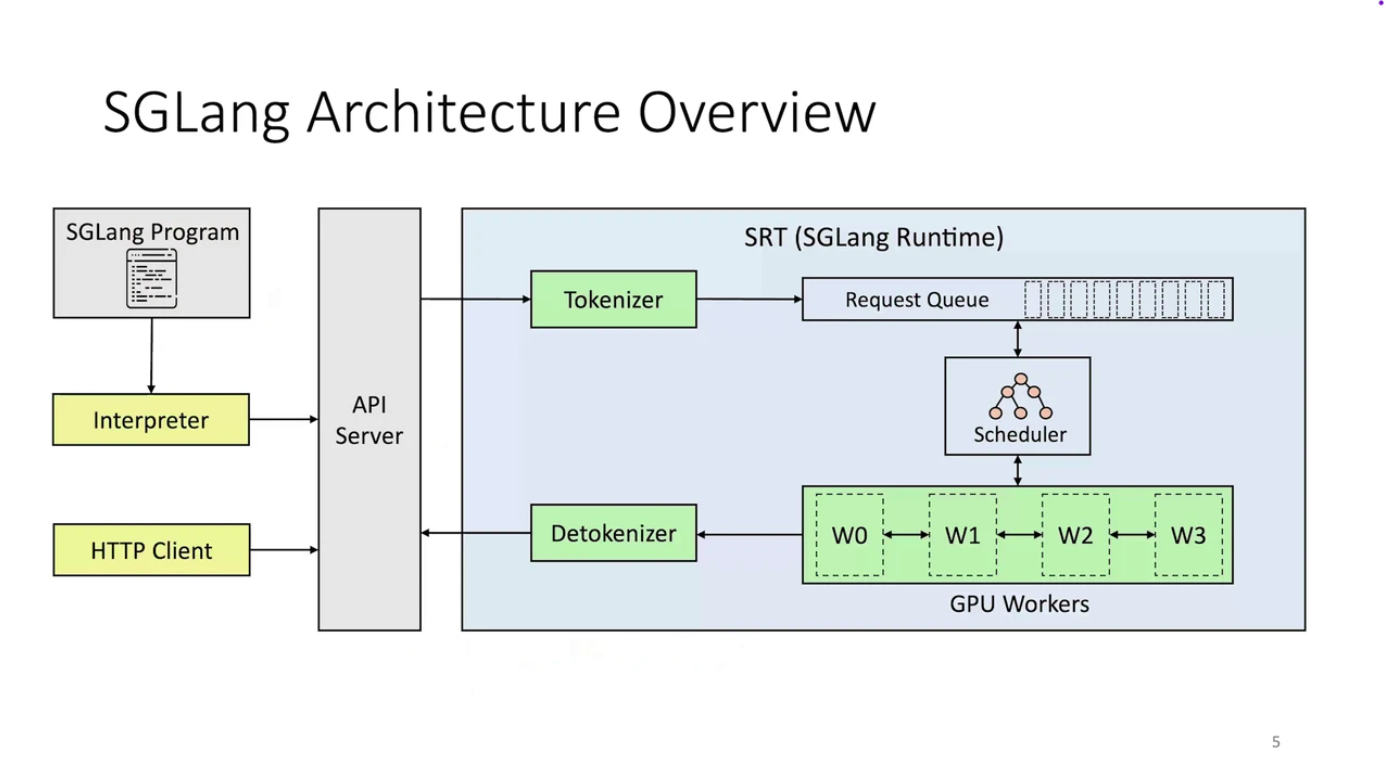
In this tutorial, we’ll explore how to deploy a Vision Language Model (VLM) using SGLang on Cerebrium. A VLM is an AI model that combines a large language model (LLM) with a vision encoder, allowing it to understand and process both images and text. We’ll build an intelligent ad analysis system that evaluates advertisements across multiple dimensions, giving us a score on how the advertisement relates to the business in quesion and how it scores on the given criteria. SGLang (Structured Generation Language) differs from other inference frameworks such as vLLM and TensorRT by focusing no structed generation and complex workflows multi-step LLM workflows. SGLang is being used in production by teams at xAI and Deepseek to power their core language model capabilities making it a trusted choice.

SGLang Architecture

SGLang isn’t just a domain-specific language (DSL). It’s a complete, integrated execution system, designed with a clear seperation of functionality:
LayerWhat it doesWhy it matters
FrontendWhere you define your LLM logic (with gen, fork, join, etc.)This keeps your code clean, readable, and your workflows easily reusable.
BackendWhere SGLang intelligently figures out how to run your logic most efficiently.This is where the speed, scalability, and optimized inference truly come to life.
To give you quick example, here are some primitives on the frontend you can use to create multi-step workflows:
PrimitiveWhat it doesExample
gen()Generates a text spangen("title", stop="\n")
fork()Splits execution into multiple branchesFor parallel sub-tasks
join()Merges branches back togetherFor combining outputs
select()Chooses one option from manyFor controlled logic, like multiple choice
SGLang Architecture Here is a summary of key advantages over traditional inference engines
FeatureTraditional Engines (vLLM, TGI)SGLang
Programming ModelSequential API calls with manual prompt chainingNative structured logic with gen(), fork(), join(), select()
Memory ManagementBasic KV caching, often discarded between callsRadixAttention: Intelligent prefix-aware cache reuse (up to 6x faster)
Output ControlHope and pray for correct formattingCompressed FSMs: Guaranteed structured output (JSON, XML, etc.)
Parallel ProcessingManual batching and coordinationBuilt-in fork() and join() for parallel execution
PerformanceStandard inference optimizationPyTorch-native with torch.compile(), quantization, sparse inference
If you would like to read more, checkout this article. Let us show this in practice with our tutorial. You can see the final code sample here

Tutorial

Step 1: Project Setup

First, let’s create our project structure:
cerebrium init 7-vision-language-sglang
cd 7-vision-language-sglang

Step 2: Configure Dependencies

The VLM we will be using is Qwen3-VL-30B-A3B-Instruct-FP8 model, which need a lot of GPU memory - we configure this in our cerebrium.toml. Cerebrium runs containers in the cloud and this file defines our environment, hardware, and scaling settings. We’ll use an ADA_L40 GPU to accommodate our model’s memory requirements. The configuration includes:
  • Hardware settings for GPU, CPU and memory allocation
  • Scaling parameters to control instance counts
  • Required pip packages like SGLang, flashinfer (our chosen backend), and PyTorch
  • APT system dependencies
  • FastAPI server configuration for hosting our API
For a complete reference of all available TOML settings, see our TOML Reference. While we use flashinfer as our backend here, other options like flash attention are also available depending on your needs. Update your cerebrium.toml with:
[cerebrium.deployment]
name = "7-vision-language-sglang"
python_version = "3.11"
docker_base_image_url = "nvidia/cuda:12.8.0-devel-ubuntu22.04"
deployment_initialization_timeout = 860

[cerebrium.hardware]
cpu = 6.0
memory = 60.0
compute = "ADA_L40"

[cerebrium.scaling]
min_replicas = 0
max_replicas = 2

[cerebrium.build]
use_uv = true

[cerebrium.dependencies.pip]
transformers = "latest"
huggingface_hub = "latest"
pydantic = "latest"
pillow = "latest"
requests = "latest"
torch = "latest"
"sglang[all]" = "latest"
"sgl-kernel" = "latest"
"flashinfer-python" = "latest"

[cerebrium.dependencies.apt]
libnuma-dev = "latest"

[cerebrium.runtime.custom]
port = 8000
entrypoint = ["uvicorn", "main:app", "--host", "0.0.0.0", "--port", "8000"]

Step 3: Implement the Ad Analysis Logic

One of the many great features of Cerebrium is we don’t enforce any special class design or way of architecing your applications - Just write your python code as if you were running it locally (and if you had a GPU ;). Below, we setup our SGLang Runtime Engine (Backend) with our FastAPI and load the model on startup of the container. This means we will incur a model load on the first request but subsequent requests will execute instantaneously. In your main.py file:
import sglang as sgl
from sglang import function
from fastapi import FastAPI, HTTPException
from transformers import AutoProcessor

app = FastAPI(title="Vision Language SGLang API")
model_path = "Qwen/Qwen3-VL-30B-A3B-Instruct-FP8"
processor = AutoProcessor.from_pretrained(model_path)

@app.on_event("startup")
def _startup_warmup():
    # Initialize engine on main thread during app startup
    runtime = sgl.Runtime(
        model_path=model_path,
        enable_multimodal=True,
        mem_fraction_static=0.8,
        tp_size=1,
        attention_backend="flashinfer",
    )
    runtime.endpoint.chat_template = sgl.lang.chat_template.get_chat_template(
        "qwen2-vl"
    )
    sgl.set_default_backend(runtime)


@app.get("/health")
def health():
    return {
        "status": "healthy",
    }
In order to score the advertisement, we will be using one of the core differentiators of SGLang, fork, which allows us to run many prompts in parallel and bring the results together in the end. This allows us to execute alot of simulaneous requests with no increase in total latency. Lastly, we bring these results together and structure them in a specific format to return to the user.
@function
def analyze_ad(s, image, ad_description, dimensions):
    s += sgl.system("Evaluate an advertisement about an company's description.")
    s += sgl.user(sgl.image(image) + "Company Description: " + ad_description)
    s += sgl.assistant("Sure!")

    s += sgl.user("Is the company description related to the image?")
    s += sgl.assistant(sgl.select("related", choices=["yes", "no"]))
    if s["related"] == "no":
        return

    forks = s.fork(len(dimensions))
    for i, (f, dim) in enumerate(zip(forks, dimensions)):
        f += sgl.user("Evaluate based on the following dimension: " +
                      dim + ". End your judgment with the word 'END'")
        # Use unique slot names per dimension to avoid collisions
        f += sgl.assistant("Judgment: " + sgl.gen(f"judgment_{i}", stop="END"))

    s += sgl.user("Provide a one-sentence synthesis of the overall evaluation, then we will output JSON.")
    s += sgl.assistant(sgl.gen("summary_one_liner", stop="."))

    schema = r'^\{"summary": ".{1,400}", "grade": "[ABCD][+\-]?"\}$'
    s += sgl.user("Return only a 3 line parapgrah JSON object with keys summary and grade (A, B, C, D, +, -), where summary briefly synthesizes the above judgments.")
    s += sgl.assistant(sgl.gen("output", regex=schema))
To end, let us bring it all together in an endpoint and
from pydantic import BaseModel
import base64
import io
import json
from PIL import Image

class AnalyzeRequest(BaseModel):
    image_base64: str
    ad_description: str
    dimensions: list

def process_image(image_base64: str) -> Image.Image:
    image_data = base64.b64decode(image_base64)
    return Image.open(io.BytesIO(image_data))

@app.post("/analyze")
def analyze_advertisement(req: AnalyzeRequest):
    try:
        image = process_image(req.image_base64)
        state = analyze_ad.run(image, req.ad_description, req.dimensions)
        try:
            print(state)
            output = state["output"]
        except KeyError:
            output = None
        if isinstance(output, str):
            start = output.find("{")
            end = output.rfind("}") + 1
            if start != -1 and end > start:
                return {
                    "success": True,
                    "analysis": json.loads(output[start:end]),
                    "dimensions_evaluated": req.dimensions
                }
        return {
            "success": True,
            "analysis": output,
            "dimensions_evaluated": req.dimensions
        }
    except Exception as e:
        raise HTTPException(status_code=500, detail=str(e))


Thats it! Let’s deploy your application so it becomes a scalable inference endpoint

Step 4: Deploy Your Application

Run:
cerebrium deploy
Once deployed, test your application with a sample request:
curl -X POST "https://api.aws.us-east-1.cerebrium.ai/v4/p-<YOUR-PROJECT-ID>/7-vision-language-sglang/analyze" \
  -H "Content-Type: application/json" \
  -d '{
    "company_description": "Nike is a global leader in athletic footwear, apparel, and sports equipment known for its innovative designs and the iconic “swoosh” logo. The brand embodies performance, style, and inspiration, empowering athletes worldwide to Just Do It."",
    "image_base64": "<BASE64_ENCODED_IMAGE>",
    "dimensions": ["Effectiveness","Clarity", "Appeal","Credibility"]
  }'
Nike AD

Example Response

{
  "success": true,
  "analysis": {
    "summary": "The company description is relevant to the image because it accurately reflects Nike's branding, which is showcased through the advertised sneaker and logo. The ad promotes Nike's core products—athletic footwear—and its values of performance, style, and inspiration, aligning with the brand's identity. The collaboration with a superhero theme further emphasizes innovation and empowerment, core ",
    "grade": "A"
  },
  "dimensions_evaluated": ["Effectiveness", "Clarity", "Appeal", "Credibility"]
}
We’ve demonstrated a simple application how to leverage SGLang’s powerful structured generation capabilities to build a naive ad analysis system. By using features like fork() for parallel processing and SGLang’s built-in output control. You can find the complete code for this tutorial in our examples repository.
I